
This is an old revision of the document!
Table of Contents
MPAINO-8A8R
MPAINO Series is an assembled industrial Arduino combining a CPU module with digital input and output modules.
Analog input/output, temperature sensor input, and high-speed pulse output modules can be added as options.
The selected I/O and optional modules are assembled and shipped as one product. Users cannot add or remove modules.
X analog input module details
Y analog output module details
F PT100 temperature input module details
K high-speed pulse output module details
MPAINO-8A8R provides 8 digital inputs and 8 relay outputs. RS-232, RS-485, UART, and I²C communication are available.
Program the controller with Arduino IDE (Arduino C/C++) or MPINO STUDIO 2 (Arduino C/C++ & ladder logic).
Use the MPAINO-8A8R Arduino IDE getting-started guide to select the board and port and check the first input and output.
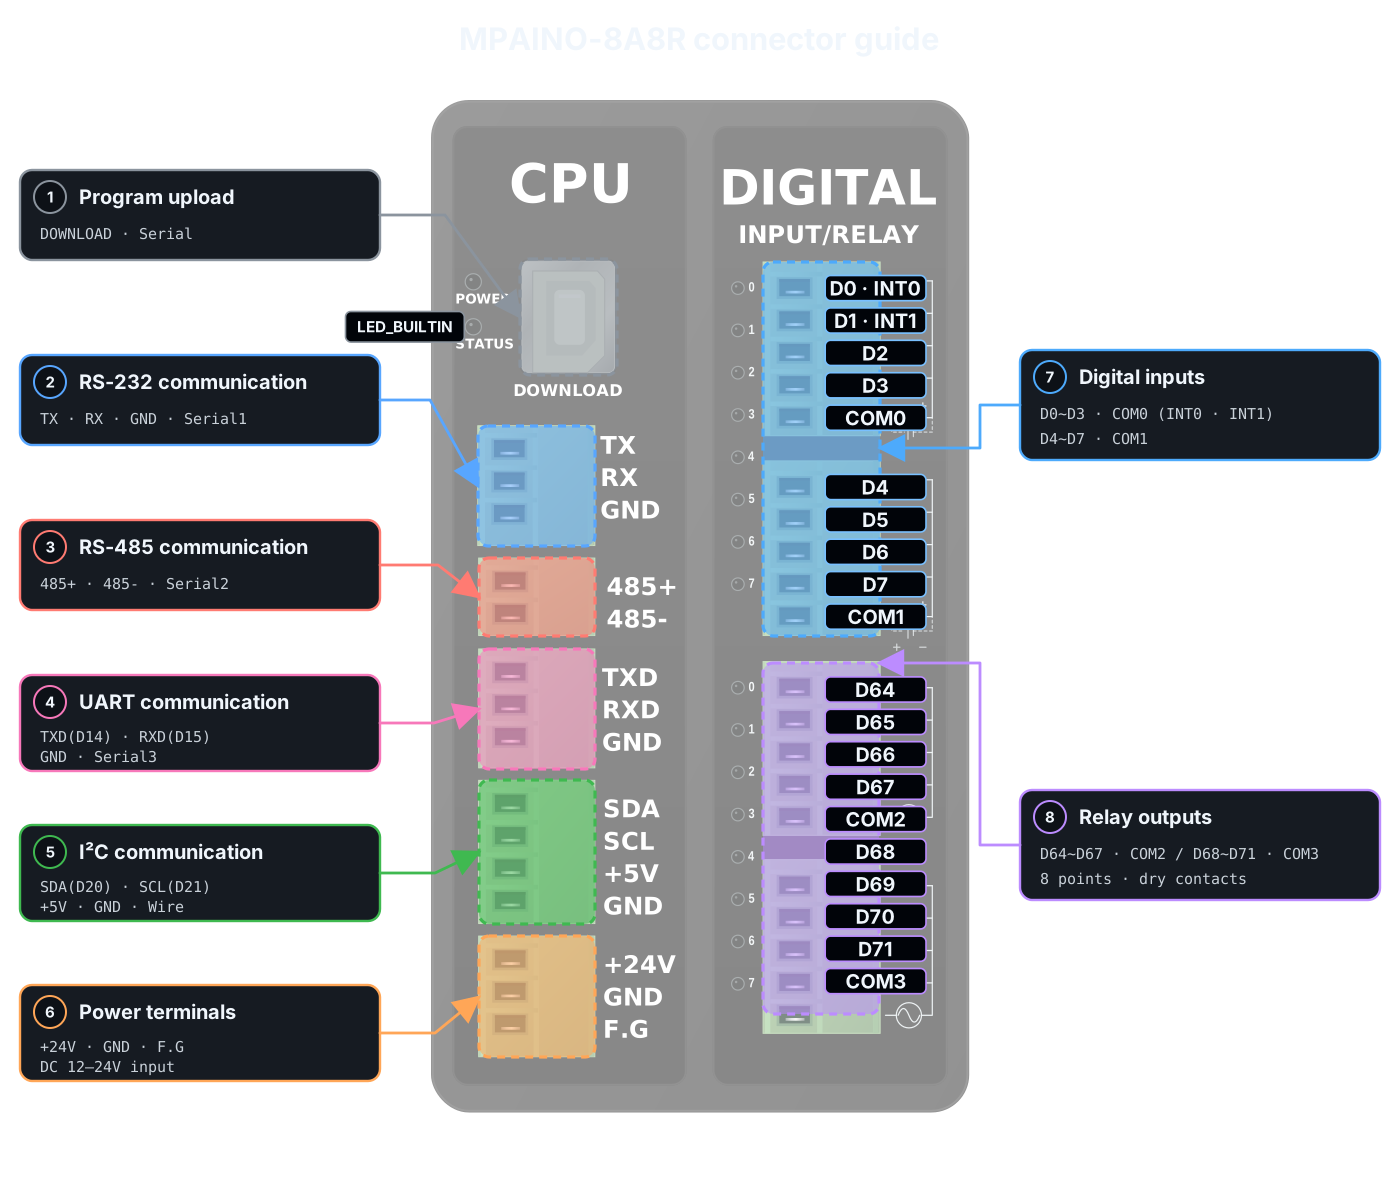
Product Specifications
| Category | Quantity | Terminal / Item | Specifications |
|---|---|---|---|
| Board | - | - | ATmega2560 Arduino Mega 2560 compatible |
| Power | - | Supply voltage | DC 12~24V For DC 24V, a power supply rated 0.5A or more is recommended |
| Digital inputs | 8 points (Isolated) | D0~D3 / COM0 D4~D7 / COM1 | operating input voltage: DC 0~40V HIGH detection voltage: DC 5V or higher 4 points/1COM NPN/PNP input support |
| Relay outputs | 8 points (Isolated dry contacts) | D64~D67 / COM2 D68~D71 / COM3 | connection voltage: DC 0~30V or AC 0~250V maximum allowable current: 5A/1 points, 8A/1COM 4 points/1COM |
| High-Speed Inputs / Interrupts | 2 points (Isolated) | D0(INT0), D1(INT1) / COM0 | Max. 8kHz Shared with digital inputs |
| 2 points (Non-isolated) | SDA(D20·INT2), SCL(D21·INT3) | Max. 50kHz Built-in 4.7kΩ pull-up Shared with I²C communication |
|
| Communication Channels | 1 channel (Non-isolated) | I²C | SDA(D20), SCL(D21) Use Wire |
| 1 channel (Non-isolated) | RS-232 | Use Serial1 |
|
| 1 channel (Non-isolated) | RS-485 | Use Serial2 |
|
| 1 channel (Non-isolated) | UART | Use Serial3 TX: D14, RX: D15 |
|
| Memory | - | Flash | 256KB |
| SRAM | 8KB | ||
| EEPROM | 4KB |
Digital inputs
| Group | Terminal | Input Configuration | Terminals and Wiring Example |
|---|---|---|---|
| COM0 | D0~D3 | 4 isolated digital inputs D0/D1 also serve as INT0/INT1 |  |
| COM1 | D4~D7 | 4 isolated digital inputs |
The digital inputs are isolated by optocouplers and accept DC 5~24V NPN or PNP switches and sensors. Select the input type through the wiring polarity of each COM terminal.
- If the input terminal receives DC 5~24V, connect the corresponding COM to GND.
- If the input terminal receives GND, connect the corresponding COM to DC 5~24V.
Even with analog-output or high-speed-pulse options YK, Y2K, K2, Y3, Y4 installed, the program uses digital inputs D0~D7 in the same way. INT0·INT1 are unavailable in that configuration.
Example program · digital inputs
Read the states of input logical numbers 0~7 with digitalRead(). The current ILOGICS core internally translates the original physical D numbers printed on the terminals.
void setup() {
  Serial.begin(115200);
}

void loop() {
  for (uint8_t ch = 0; ch < 8; ++ch) {
    Serial.print(ch);
    Serial.print(": " );
    Serial.println(digitalRead(ch));
  }
  delay(500);
}
Related built-in functions
Function example · consecutive-read filter: IdigitalRead()
Function details: IdigitalRead()
Function prototype
bool IdigitalRead(uint8_t pin, uint8_t samples);
IdigitalRead(0, 5) reads input 0 5 times consecutively. Update the state when all readings are HIGH or all are LOW; mixed readings retain the previous state. Unlike a time-based debounce filter, it inserts no delay between readings.
void setup() {
  Serial.begin(115200);
}

void loop() {
  const bool inputOn = IdigitalRead(0, 5);  // Read input 0 five times consecutively and return the stable state
  Serial.println(inputOn ? F("Input 0 ON") : F("Input 0 OFF"));
  delay(200);
}
Function example · debouncing: Ibounce(), IbounceOn(), IbounceOff()
Function details: Ibounce() · IbounceOn() · IbounceOff()
Function prototype
bool Ibounce(uint8_t pin, uint32_t debounceTime);
bool IbounceOn(uint8_t pin, uint32_t debounceTime);
bool IbounceOff(uint8_t pin, uint32_t debounceTime);
Compare three filters on input 0. The return value is the filtered ON/OFF state.
Ibounce(0, 30): Apply either ON or OFF after it remains stable for at least 30ms.IbounceOn(0, 500): Delay ON by 500ms; apply OFF immediately.IbounceOff(0, 500): Delay OFF by 500ms; apply ON immediately.
Each function operates independently, even on the same pin. Run the filters on every loop() iteration and display only the results at 200ms intervals.
unsigned long lastPrint = 0;

void setup() {
  Serial.begin(115200);
}

void loop() {
  const bool stable = Ibounce(0, 30);  // Filter input 0 ON/OFF chatter over 30ms
  const bool onDelayed = IbounceOn(0, 500);  // Delay only input 0 ON by 500ms; apply OFF immediately
  const bool offDelayed = IbounceOff(0, 500);  // Delay only input 0 OFF by 500ms; apply ON immediately

  if (millis() - lastPrint >= 200) {
    lastPrint = millis();
    Serial.print(F("Ibounce: "));
    Serial.print(stable);
    Serial.print(F(", IbounceOn: "));
    Serial.print(onDelayed);
    Serial.print(F(", IbounceOff: "));
    Serial.println(offDelayed);
  }
}
Function example · input toggle: Ialt()
Function details: Ialt()
Function prototype
void Ialt(bool input, bool &state_var);
Ialt(input, state) inverts state whenever the input changes from OFF to ON. Pressing input 0 once turns output 64 ON; pressing again turns it OFF. Holding the input retains the state. The example debounces the input with Ibounce(0, 30) before passing it to Ialt(). outputOn is a global variable retained between calls, and Ialt() modifies it directly.
bool outputOn = false;

void setup() {
  Serial.begin(115200);
  digitalWrite(64, LOW);
}

void loop() {
  const bool previous = outputOn;
  const bool inputOn = Ibounce(0, 30);  // Filter input 0 ON/OFF chatter over 30ms
  Ialt(inputOn, outputOn);  // Invert outputOn on an OFF→ON input transition
  digitalWrite(64, outputOn ? HIGH : LOW);

  if (outputOn != previous) {
    Serial.println(outputOn ? F("Output 64 ON") : F("Output 64 OFF"));
  }
}
Relay outputs
| Group | Output terminals | Contact configuration | Terminals and Wiring Example |
|---|---|---|---|
| COM2 | D64~D67 | 4 relay outputs share COM2 |  |
| COM3 | D68~D71 | 4 relay outputs share COM3 |
Relay outputs are dry contacts. When ON, the output terminal physically connects to COM, allowing control of DC and AC loads. Connect the separate load power supply to COM, rather than the relay output terminal.
| Item | Rating |
|---|---|
| Connection voltage | DC 0~30V or AC 0~250V |
| Maximum allowable current | 5A/1 points |
| Maximum allowable current per COM | 8A/1COM |
Example program · relay outputs
Map inputs 0~7 to outputs 64~71. When HIGH, the dry relay contact turns ON.
void setup() {
  for (uint8_t ch = 0; ch < 8; ++ch) digitalWrite(64 + ch, LOW);
}

void loop() {
  for (uint8_t ch = 0; ch < 8; ++ch) {
    digitalWrite(64 + ch, digitalRead(ch));
  }
}
Interrupts / High-speed inputs
| Terminal | Configuration | Maximum input frequency | Mutually exclusive functions | Encoder wiring |
|---|---|---|---|---|
| D0(INT0), D1(INT1) / COM0 | Isolated inputs | 8kHz | YK / Y2K / K2 / Y3 / Y4 option configuration |  |
| SDA(D20·INT2), SCL(D21·INT3) | Non-isolated input, built-in 4.7kΩ pull-up | 50kHz | I²C communication |
Connect the encoder with phase A on SDA(D20) and phase B on SCL(D21). When SDA·SCL are used as encoder or interrupt inputs, I²C communication cannot be used simultaneously on the same terminals.
Example program · pulse counting
SDA(D20) on the I²C terminals is a 4.7kΩ pull-up input. Do not use this example simultaneously with I²C communication. In the MPAINO board package, argument 2 of digitalPinToInterrupt() is the logical interrupt number assigned to SDA, not digital input 2. Count FALLING edges when SDA changes from HIGH to LOW. This is a software ISR example and does not guarantee lossless counting at the maximum frequency.
#include <util/atomic.h>

static_assert(digitalPinToInterrupt(2) == 3, "SDA interrupt mapping");
volatile uint32_t pulseCount = 0;
void onPulse() { ++pulseCount; }

void setup() {
  Serial.begin(115200);
  attachInterrupt(digitalPinToInterrupt(2), onPulse, FALLING);
}

void loop() {
  uint32_t count;
  ATOMIC_BLOCK(ATOMIC_RESTORESTATE) { count = pulseCount; }
  Serial.println(count);
  delay(500);
}
Example program · encoder inputs
SDA(D20) on the I²C terminals is a 4.7kΩ pull-up input. Do not use this example simultaneously with I²C communication. In the MPAINO board package, argument 2 of digitalPinToInterrupt() is the logical interrupt number assigned to SDA, not digital input 2. Connect phase A to SDA and phase B to SCL. At the falling edge of phase A, increment when B is HIGH and decrement when B is LOW. The direction changes with the phase A/B connections. Because SCL overlaps the digital module logical numbers, read the physical pin state directly.
#include <util/atomic.h>

static_assert(digitalPinToInterrupt(2) == 3, "SDA interrupt mapping");
volatile int32_t position = 0;

void onEncoder() {
  // Read the physical SCL pin directly because its number overlaps a digital module logical number
  const bool bHigh = (*portInputRegister(digitalPinToPort(SCL)) & digitalPinToBitMask(SCL)) != 0;
  if (bHigh) ++position;
  else --position;
}

void setup() {
  Serial.begin(115200);
  attachInterrupt(digitalPinToInterrupt(2), onEncoder, FALLING);
}

void loop() {
  int32_t value;
  ATOMIC_BLOCK(ATOMIC_RESTORESTATE) { value = position; }
  Serial.println(value);
  delay(500);
}
Communication and program upload
| Function | Arduino object | Terminals / Pins | Device Wiring |
|---|---|---|---|
| Program upload and monitoring | Serial | Download port |  |
| RS-232 | Serial1 | CPU module RS-232 terminals | |
| RS-485 | Serial2 | CPU module RS-485 terminals | |
| UART | Serial3 | TX: D14, RX: D15 | |
| I²C | Wire | SDA: D20, SCL: D21 |
The RS-232, RS-485, and UART channels support the built-in Modbus RTU Master/Slave and LS Industrial Systems Cnet functions.
Example program · basic communication
Forward characters between Serial(115200bps) and RS-232(Serial1, 9600bps, 8N1). Run each port example independently.
// Serial Monitor via USB download port ↔ RS-232 Serial1
void setup() {
  Serial.begin(115200);
  Serial1.begin(9600);  // Also configure the other device for 9600 bps, 8-N-1
}

void loop() {
  if (Serial.available() && Serial1.availableForWrite()) {
    Serial1.write(Serial.read());
  }
  if (Serial1.available() && Serial.availableForWrite()) {
    Serial.write(Serial1.read());
  }
}
Forward characters between Serial(115200bps) and RS-485(Serial2, 9600bps, 8N1). Run each port example independently.
// USB download port Serial Monitor ↔ RS-485 Serial2
void setup() {
  Serial.begin(115200);
  Serial2.begin(9600);  // Also configure the other device for 9600 bps, 8-N-1
}

void loop() {
  if (Serial.available() && Serial2.availableForWrite()) {
    Serial2.write(Serial.read());
  }
  if (Serial2.available() && Serial.availableForWrite()) {
    Serial.write(Serial2.read());
  }
}
Forward characters between Serial(115200bps) and UART(Serial3, 9600bps, 8N1). Run each port example independently.
// USB download port Serial Monitor ↔ UART Serial3
void setup() {
  Serial.begin(115200);
  Serial3.begin(9600);  // Also configure the other device for 9600 bps, 8-N-1
}

void loop() {
  if (Serial.available() && Serial3.availableForWrite()) {
    Serial3.write(Serial.read());
  }
  if (Serial3.available() && Serial.availableForWrite()) {
    Serial.write(Serial3.read());
  }
}
Example program · I²C communication
Scan for I²C device addresses on SDA·SCL. Do not run this simultaneously with pulse/encoder examples that use the same terminals.
#include <Wire.h>

void setup() {
  Serial.begin(115200);
  Wire.begin();
  Wire.setClock(100000);
}

void loop() {
  uint8_t found = 0;
  for (uint8_t address = 0x08; address <= 0x77; address++) {
    Wire.beginTransmission(address);
    const uint8_t result = Wire.endTransmission();
    if (result == 0) {
      Serial.print(F("I2C: 0x"));
      if (address < 16) Serial.print('0');
      Serial.println(address, HEX);
      found++;
    }
  }
  Serial.print(F("Devices: "));
  Serial.println(found);
  delay(3000);
}
Example program · Modbus RTU communication
Related built-in functions
Function example · Modbus RTU Slave: ImodbusRTUMem(), ImodbusRTUAdr(), ImodbusRTUInit(), ImodbusRTU()
Function details: ImodbusRTUMem() · ImodbusRTUAdr() · ImodbusRTUInit() · ImodbusRTU()
Function prototype
void ImodbusRTUMem(uint16_t m_size, uint16_t d_size);
void ImodbusRTUAdr(uint16_t m_offset, uint16_t d_offset);
void ImodbusRTUInit(HardwareSerial& serialPort, uint8_t slaveId, long baudrate);
void ImodbusRTU();
Store input 0 in M[0] and operating time (seconds) in D[0] for the other device to read. Configure RS-485(Serial2), station 1, 9600bps, 8N1. Read M[0] with FC01, start address 0, 1 bit; read D[0] with FC03, start address 0, 1 word. Addresses are actual transmitted addresses, starting from 0. Call the communication function on every loop() iteration; this example does not control outputs.
M and D are shared global memory provided by the core. Run this sketch on its own. When combining protocols, do not allocate the shared memory more than once.
unsigned long lastPrint = 0;
bool memoryReady = false;

void setup() {
  Serial.begin(115200);
  ImodbusRTUMem(8, 8);  // Allocate 8 M bits and 8 D words
  ImodbusRTUAdr(0, 0);  // Set the M and D communication start addresses to 0
  ImodbusRTUInit(Serial2, 1, 9600);  // Start RS-485 at station 1, 9600bps
  memoryReady = (M != nullptr && D != nullptr);
  if (!memoryReady) Serial.println(F("Memory allocation failed"));
}

void loop() {
  if (!memoryReady) return;
  M[0] = digitalRead(0);
  D[0] = (uint16_t)(millis() / 1000UL);
  ImodbusRTU();  // Process incoming Modbus RTU requests

  if (millis() - lastPrint >= 1000) {
    lastPrint = millis();
    Serial.print(F("M[0]: "));
    Serial.print(M[0]);
    Serial.print(F(", D[0]: "));
    Serial.println(D[0]);
  }
}
Function example · Modbus RTU Master: ImodbusRTUmasterInit(), ImodbusRTUmaster()
Function details: ImodbusRTUmasterInit() · ImodbusRTUmaster()
Function prototype
void ImodbusRTUmasterInit(HardwareSerial& serialPort, long baudrate, uint8_t config);
uint8_t ImodbusRTUmaster(HardwareSerial& serialPort, uint8_t slaveId, uint8_t functionCode, uint16_t address, uint16_t quantity, uint16_t* data, uint16_t timeoutMs = 100);
Read 1 holding register from the slave every 1 second over RS-485(Serial2). Configure the other device for station 1, 9600bps, 8N1, FC03, and on-wire start address 0. The response is stored in received[0] and displayed only on success. Error codes are displayed in hexadecimal. This is a separate sketch from the slave example above and uses a receive array instead of M/D memory.
unsigned long lastRequest = 0;
uint16_t received[1];

void setup() {
  Serial.begin(115200);
  ImodbusRTUmasterInit(Serial2, 9600, SERIAL_8N1);  // Start RS-485 as a Modbus master
}

void loop() {
  if (millis() - lastRequest < 1000) return;
  lastRequest = millis();
  const uint8_t result = ImodbusRTUmaster(Serial2, 1, 3, 0, 1, received, 200);  // Read 1 word at address 0 from station 1, timeout 200ms

  if (result == IMODBUS_RTU_SUCCESS) {
    Serial.print(F("Register 0: "));
    Serial.println(received[0]);
  } else {
    Serial.print(F("Modbus error: 0x"));
    Serial.println(result, HEX);
  }
}
Example program · LS Industrial Systems Cnet communication
Related built-in functions
Function example · LS Industrial Systems Cnet SLave: ICnetMem(), ICnetAdr(), ICnetInit(), ICnet()
Function details: ICnetMem() · ICnetAdr() · ICnetInit() · ICnet()
Function prototype
void ICnetMem(uint16_t m_size, uint16_t d_size, uint16_t r_size = 100);
void ICnetAdr(uint16_t m_offset, uint16_t d_offset, uint16_t r_offset = 0);
void ICnetInit(HardwareSerial& serialPort, uint8_t slaveId, long baudrate);
void ICnet();
Store input 0 in M[0] and operating time (seconds) in D[0] for the HMI to read. Configure the other device for LS Industrial Systems Cnet, RS-232, station 1, 9600bps, 8N1. Read %MX00000(M[0]) for the bit and %DW0(D[0]) for the word. Call the communication function on every loop() iteration; this example does not control outputs.
M, D, and R are shared global memory provided by the core; this example does not use R. Run this separately from the Modbus example. When combining protocols, do not allocate the shared memory more than once.
unsigned long lastPrint = 0;
bool memoryReady = false;

void setup() {
  Serial.begin(115200);
  ICnetMem(8, 8, 0);  // Allocate 8 M bits and 8 D words; R is unused
  ICnetAdr(0, 0, 0);  // Set the M and D communication start addresses to 0
  ICnetInit(Serial1, 1, 9600);  // Start RS-232 at station 1, 9600bps
  memoryReady = (M != nullptr && D != nullptr);
  if (!memoryReady) Serial.println(F("Memory allocation failed"));
}

void loop() {
  if (!memoryReady) return;
  M[0] = digitalRead(0);
  D[0] = (uint16_t)(millis() / 1000UL);
  ICnet();  // Process incoming LS Cnet requests

  if (millis() - lastPrint >= 1000) {
    lastPrint = millis();
    Serial.print(F("M[0]: "));
    Serial.print(M[0]);
    Serial.print(F(", D[0]: "));
    Serial.println(D[0]);
  }
}
Optional modules
The following optional modules can be added to the product configuration. The product is assembled and shipped in the selected configuration.
Users cannot add or remove I/O modules or optional modules.
| Code | Function | Points per module | Maximum configuration | Key features |
|---|---|---|---|---|
| X · Details | Analog inputs | 4 points | Up to 5 units, 20 points | ADS1118 Select DC 0~5V / 0~10V / 0(4)~20mA / NTC input |
| F · Details | PT100Ω temperature sensor input | 4 points | Up to 5 units, 20 points | ADS1118 2-wire or 3-wire PT100Ω input |
| Y · Details | Analog outputs | 3 points | Up to 4 units, 12 points | PWM smoothing Select DC 0~5V / 0~10V / 0(4)~20mA output |
| K · Details | High-speed pulse outputs | 6 points | Up to 2 units, 12 points | Direct MCU PWM signal output |
The combined total of analog inputs and PT100Ω temperature sensor inputs cannot exceed 20 points.
The combined total of analog outputs and high-speed pulse outputs cannot exceed 12 points.
Products with optional modules are custom-built, so exchanges or refunds may be difficult.
This example is for a product shipped with the corresponding optional module. Match the module configuration shown in the example to the actual factory configuration.
Example program · analog inputs (with X module installed)
This configuration has 1 installed X module with Analog Input Module → X selected. analogRead(0~3) reads the ADS1118 raw values (0~32767) from the first X module. Match each channel's DIP settings and wiring to its input signal.
void setup() {
  Serial.begin(115200);
}

void loop() {
  for (uint8_t ch = 0; ch < 4; ++ch) {
    Serial.print(ch);
    Serial.print(": " );
    Serial.println(analogRead(ch));
  }
  delay(500);
}
Related built-in functions
Function example · input range scaling: IanalogRead(), IanalogReadf()
Function details: IanalogRead() · IanalogReadf()
Function prototype
int32_t IanalogRead(uint8_t ch, int32_t min, int32_t max);
float IanalogReadf(uint8_t ch, float min, float max);
This example configures X module channel 0 for 0~5V and channel 1 for current input. Both functions scale the ADC input to the specified min~max range. IanalogRead() returns an integer with the fractional part discarded; IanalogReadf() returns a floating-point value. Display the 0~5V input on channel 0 as both 0~100% and voltage. For the 0~20mA input on channel 1, specify the range 0~20 to read the actual current.
void setup() {
  Serial.begin(115200);
}

void loop() {
  const int32_t percent = IanalogRead(0, 0, 100);  // Scale input 0 to an integer from 0~100%
  const float voltage = IanalogReadf(0, 0.0f, 5.0f);  // Scale input 0 to a floating-point value from 0~5V
  const float current = IanalogReadf(1, 0.0f, 20.0f);  // Scale input 1 to a floating-point value from 0~20mA
  Serial.print(F("0: "));
  Serial.print(percent);
  Serial.print(F(" %, "));
  Serial.print(voltage, 2);
  Serial.print(F(" V, 1: "));
  Serial.print(current, 2);
  Serial.println(F(" mA"));
  delay(500);
}
Function example · 4~20mA range scaling: IanalogRead2(), IanalogRead2f()
Function details: IanalogRead2() · IanalogRead2f()
Function prototype
int32_t IanalogRead2(uint8_t ch, int32_t min, int32_t max);
float IanalogRead2f(uint8_t ch, float min, float max);
This example configures X module channel 0 for 0~5V and channel 1 for current input. Scale the 4~20mA sensor input connected to channel 1 to a user-defined range. IanalogRead2(channel 1, 0, 100) returns an integer mapping 4mA to 0% and 20mA to 100%. IanalogRead2f(channel 1, 4.0f, 20.0f) returns the current as a floating-point value. Below approximately 3.6mA, both functions return ANALOG_READ2_ERROR(65535); from approximately 3.6~4mA, they return the specified minimum.
void setup() {
  Serial.begin(115200);
}

void loop() {
  const int32_t percent = IanalogRead2(1, 0, 100);  // Scale input 1 at 4~20mA to an integer from 0~100%
  const float current = IanalogRead2f(1, 4.0f, 20.0f);  // Convert input 1 at 4~20mA to a floating-point current value
  if (percent == ANALOG_READ2_ERROR ||
      current == (float)ANALOG_READ2_ERROR) {
    Serial.println(F("1: 4-20mA input error"));
  } else {
    Serial.print(F("1: "));
    Serial.print(percent);
    Serial.print(F(" %, "));
    Serial.print(current, 2);
    Serial.println(F(" mA"));
  }
  delay(500);
}
Function example · moving average: analogReadAvg(), analogRead2Avg()
Function details: analogReadAvg() · analogRead2Avg()
Function prototype
int32_t analogReadAvg(uint8_t ch, uint8_t samples);
int32_t analogRead2Avg(uint8_t ch, uint8_t samples);
This example configures X module channel 0 for 0~5V and channel 1 for current input. analogReadAvg(channel 0, 5) returns a moving average of channel 0 ADC raw values (0~32767); analogRead2Avg(channel 1, 5) returns a moving average of channel 1 4~20mA corrected values (4mA=0, 20mA=32767). It averages up to 5 valid values from recent calls; it does not perform 5 reads in one call. The maximum samples value is 20. analogRead2Avg() returns ANALOG_READ2_AVG_ERROR(-1) for inputs below approximately 3.6mA.
void setup() {
  Serial.begin(115200);
}

void loop() {
  const int32_t voltageAvg = analogReadAvg(0, 5);  // Moving average of up to 5 recent ADC values from input 0
  const int32_t currentAvg = analogRead2Avg(1, 5);  // Moving average of up to 5 recent 4~20mA-adjusted values from input 1
  Serial.print(F("0 ADC average: "));
  Serial.print(voltageAvg);
  Serial.print(F(", 1 4-20mA average: "));
  if (currentAvg == ANALOG_READ2_AVG_ERROR) {
    Serial.println(F("input error"));
  } else {
    Serial.println(currentAvg);
  }
  delay(500);
}
Example program · NTC temperature sensor inputs (with X module installed)
With 1 X module and Analog Input Module → X selected, configure channel 0 for NTC mode. First check the raw value with analogRead(0).
void setup() {
  Serial.begin(115200);
}

void loop() {
  Serial.println(analogRead(0));
  delay(500);
}
Related built-in functions
Function example · NTC temperature conversion: ntcRead(), ntcReadf()
Function details: ntcRead() · ntcReadf()
Function prototype
int ntcRead(uint8_t ch);
float ntcReadf(uint8_t ch);
Configure X module channel 0 for NTC mode and connect an NTC 3950 10kΩ sensor. ntcRead() returns temperature in Celsius ×10 as an integer; ntcReadf() returns floating-point degrees Celsius. Out-of-range inputs are limited to the endpoints of -40~120°C, so do not use this as an open-circuit detection function.
void setup() {
  Serial.begin(115200);
}

void loop() {
  const int temp10 = ntcRead(0);  // X channel 0 temperature in Celsius ×10
  const float tempC = ntcReadf(0);  // X channel 0 temperature as floating-point Celsius
  Serial.print(temp10);
  Serial.print(", " );
  Serial.println(tempC, 1);
  delay(500);
}
Example program · PT100 temperature sensor inputs (with F module installed)
Related built-in functions
Function example · read PT100 input: pt100Read()
Function details: pt100Read()
Function prototype
int pt100Read(uint8_t ch);
Install 1 F module and select Temperature Sensor Input Module → F. 0~3 are the channels of the first F module. Display the input values of F module channels 0~3 in the Serial Monitor.
void setup() {
  Serial.begin(115200);
}

void loop() {
  for (uint8_t ch = 0; ch < 4; ++ch) {
    const int value = pt100Read(ch);  // Read the corresponding F module channel input
    Serial.print(ch);
    Serial.print(": " );
    Serial.println(value);
  }
  delay(500);
}
Example program · analog outputs (with Y module installed)
Install 1 Y module and select Analog Output Module → Y. The value in analogWrite(0~2, value) ranges from 0~65535. Output the midpoint value 32768 on channel 0; the output voltage/current range follows the module DIP settings.
void setup() {

}

void loop() {
  analogWrite(0, 32768);
  delay(500);
}
Related built-in functions
Function example · output range scaling: IanalogWrite(), IanalogWritef()
Function details: IanalogWrite() · IanalogWritef()
Function prototype
void IanalogWrite(uint8_t ch, int32_t min, int32_t max, int32_t value);
void IanalogWritef(uint8_t ch, float min, float max, float value);
Output 50% using an integer value on Y module channel 0 and 25% using a floating-point value on channel 1. min·max define the user-value range; the module DIP switches determine the electrical output mode.
void setup() {

}

void loop() {
  IanalogWrite(0, 0, 100, 50);  // Output 50% on Y channel 0
  IanalogWritef(1, 0.0f, 100.0f, 25.0f);  // Output 25% on Y channel 1
  delay(500);
}
Example program · PWM outputs (with K module installed)
Install 1 K module, select High-Speed Pulse Output Module → K, and set Y module to None. Use 20~25 for Arduino analogWrite(), 0~5 for the built-in PWM functions, and 130~135 for GPIO control. Output approximately 50% duty on the first K output.
void setup() {

}

void loop() {
  analogWrite(20, 128);
  delay(500);
}
Related built-in functions
Function example · specify duty value: PWM()
Function details: PWM()
Function prototype
void PWM(uint8_t pin, uint16_t val, bool onDutybit16 = false);
The configuration is 1 K module, no Y module, and High-Speed Pulse Output Module → K. Logical channels 0~2 share Timer1 and 3~5 share Timer5; use the same frequency within each group. Output the 16-bit midpoint duty value 32768 on K channel 0. PWM() defaults to the 8-bit range 0~255; specifying true selects 0~65535.
void setup() {
  PWM_RESET();  // Stop PWM timers and reset their modes
  PWM(0, 32768, true);  // Output a midrange 16-bit duty value on K channel 0
}

void loop() {
}
Function example · set frequency/duty: FDPWM()
Function details: FDPWM()
Function prototype
void FDPWM(uint8_t pin, int32_t intHz, float Duty);
The configuration is 1 K module, no Y module, and High-Speed Pulse Output Module → K. Logical channels 0~2 share Timer1 and 3~5 share Timer5; use the same frequency within each group. Output 1kHz at 50% duty on K channel 0. The core has no separate FPWM(); use FDPWM().
void setup() {
  PWM_RESET();  // Stop PWM timers and reset their modes
  FDPWM(0, 1000, 50.0f);  // Output 1kHz at 50% duty on K channel 0
}

void loop() {
}
Function example · output a specified pulse count: NPWM_BEGIN(), NPWM()
Function details: NPWM_BEGIN() · NPWM()
Function prototype
void NPWM_BEGIN(uint8_t pin, uint32_t intHz, float Duty, uint32_t N);
void NPWM(uint8_t pin);
The configuration is 1 K module, no Y module, and High-Speed Pulse Output Module → K. Logical channels 0~2 share Timer1 and 3~5 share Timer5; use the same frequency within each group. Output a single burst of 100 pulses at 1kHz and 50% duty on K channel 0. Call NPWM() on every loop() iteration without inserting delay().
void setup() {
  PWM_RESET();  // Stop PWM timers and reset their modes
  NPWM_BEGIN(0, 1000, 50.0f, 100);  // Prepare 100 pulses at 1kHz, 50% duty on K channel 0
}

void loop() {
  NPWM(0);  // Process the prepared pulse output and completion
}
Function example · stop/resume channel output: PWMOFF()
Function details: PWMOFF()
Function prototype
void PWMOFF(uint8_t pin, bool POff);
The configuration is 1 K module, no Y module, and High-Speed Pulse Output Module → K. Logical channels 0~2 share Timer1 and 3~5 share Timer5; use the same frequency within each group. Turn K channel 0 on for 2 seconds, then stop it for 2 seconds. After setting the PWMOFF() flag, call FDPWM() to apply the state and hold GPIO number 130 LOW. This stop flag does not apply to NPWM().
void setup() {
  PWM_RESET();  // Stop PWM timers and reset their modes
}

void loop() {
  PWMOFF(0, false);  // Clear the stop state of K channel 0
  FDPWM(0, 1000, 50.0f);  // Apply the cleared flag and start 1kHz, 50% output
  delay(2000);

  PWMOFF(0, true);  // Set the stop state of K channel 0
  FDPWM(0, 1000, 50.0f);  // Apply the stop flag and disconnect PWM output
  digitalWrite(130, LOW);
  delay(2000);
}
Function example · stop/reset PWM timers: PWM_RESET()
Function details: PWM_RESET()
Function prototype
void PWM_RESET();
The configuration is 1 K module, no Y module, and High-Speed Pulse Output Module → K. Logical channels 0~2 share Timer1 and 3~5 share Timer5; use the same frequency within each group. Stop and reset Timer1·Timer5 in a K-only configuration. Output on channel 0 for 2 seconds, then stop. This affects all K outputs sharing the same timer.
void setup() {
  PWM_RESET();  // Stop PWM timers and reset their modes
  FDPWM(0, 1000, 50.0f);  // Output 1kHz at 50% duty on K channel 0
  delay(2000);
  PWM_RESET();  // Stop and reset all PWM on Timer1 and Timer5
  digitalWrite(130, LOW);
}

void loop() {
}
Status LED
Control the CPU module STATUS LED with D128.
Example program · status LED
Display the input 0 state on the CPU module STATUS LED (LED_BUILTIN, logical number 128).
void setup() {

}

void loop() {
  digitalWrite(LED_BUILTIN, digitalRead(0));
}
Development environment setup
- Connect the computer to the CPU module download port with a USB cable.
- Check the download port's COM number in Device Manager.
- Select the verified COM number under Tools → Port in Arduino IDE.
- Select
MPAINO-8A8R(T)under Tools → Board. - Click Verify (✓) in Arduino IDE. If there are no errors, click Upload (→) to transfer the program.
Dimensions
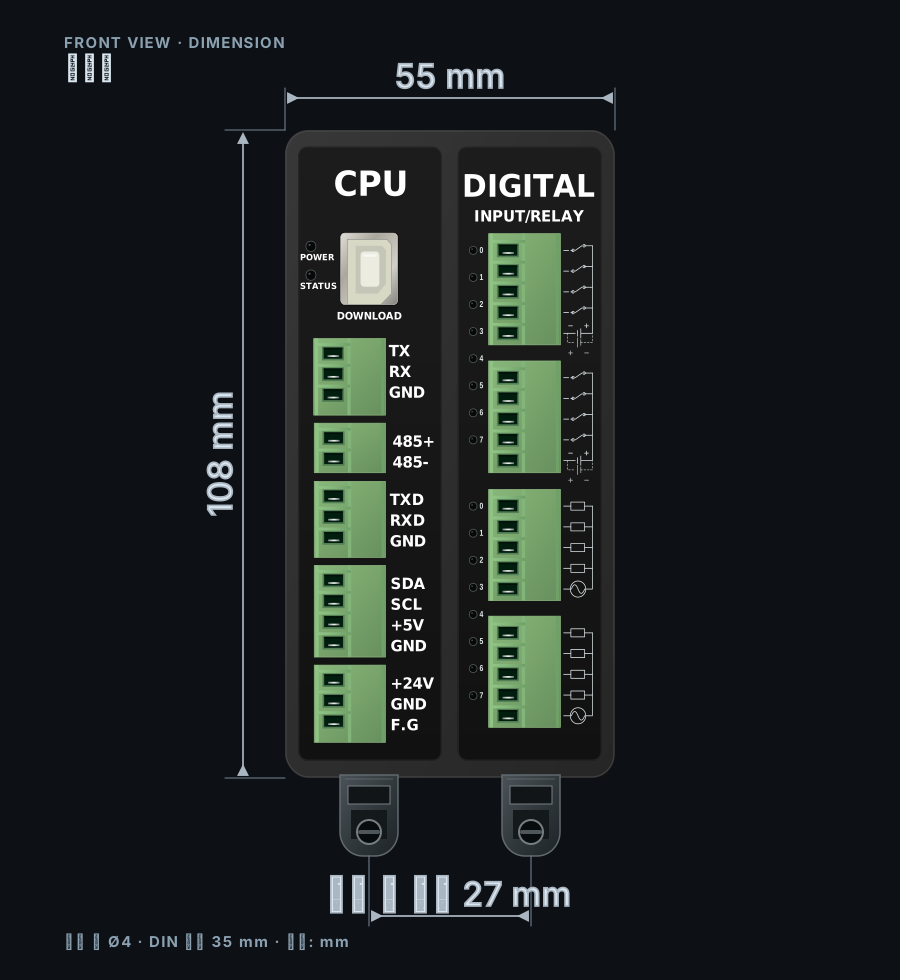
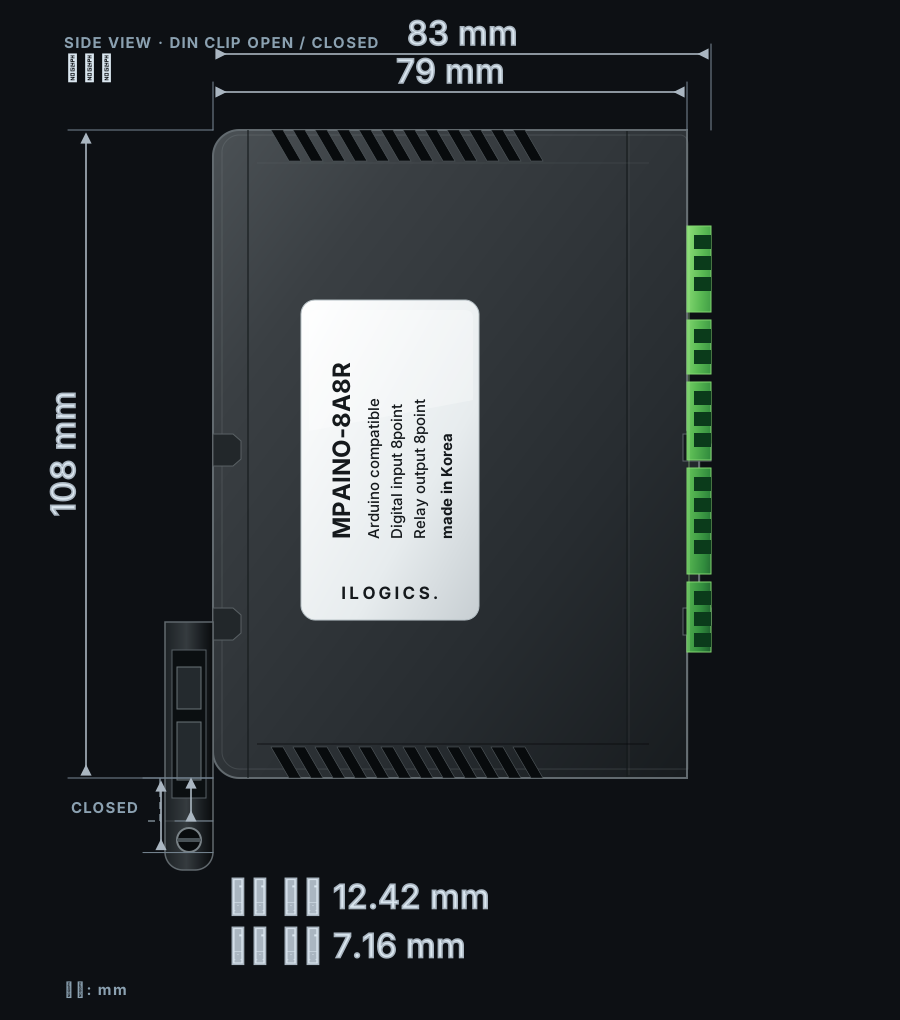
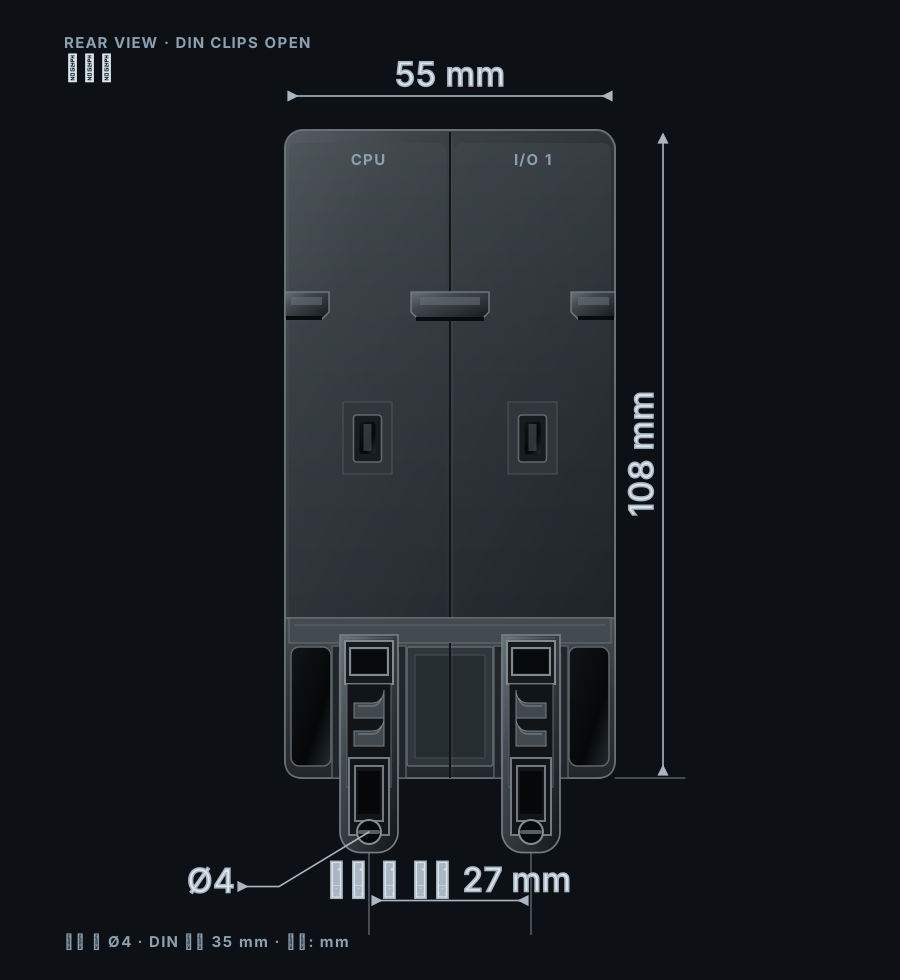
| Item | Dimensions |
|---|---|
| Product width | 55mm |
| Body height | 108mm |
| Overall height | Clip open: 120.42mm Clip closed: 115.16mm |
| Product depth | Body: 79mm Maximum with terminals: 83mm |
| Mounting hole spacing | 27mm |
| Mounting hole diameter | Ø4mm |
| DIN rail | 35mm |
| Front view | Side view |
|---|---|
 |  |
| Rear view | |
 |